Welcome to part two of the Intro to Draping series! If you haven’t already, please visit the previous post – Intro to Draping: Dress Form Basics & Markings
OK! So now that we have the dressform basics and markings down let’s move onto taking and recording the measurements of your dress form.

Materials:
– Measuring Tape
– Muslin Fabric
– Straight Pins
The materials you will need are your Taped Dress Form, please refer to the previous post – Intro to Draping: Dress Form Basics & Markings for style tape markings. A basic 60″ Measuring Tape, Muslin Fabric in order to create a Bust Bridge, Straight Pins thin enough to easily penetrate your dress form. Lastly, Dress Form Measurement Chart to record all measurements.
Prepping Before Measuring
The first step in prepping for measuring the dress form is creating a Bust Bridge by creating a muslin strip pinned over the bust from side seam to side seam.
- Cut a strip of muslin 1 1/2″W X 26″ L
- Fold muslin strip in half, press with iron. Fold muslin in half once more, press with iron
- Secure muslin strip to dress form by pinning at side seam aligning center across Bust Apex
- Cut excess muslin at side seam
- Mark Apex with contrasting color


Additionally you want to mark your Across Front and Back Placements with pins
Across Front: At Front mark halfway distance between HPS (high point shoulder) and Bust Line
Across Back: At Center Back mark halfway point between Neck and Bust Line
Measuring Your Dress Form
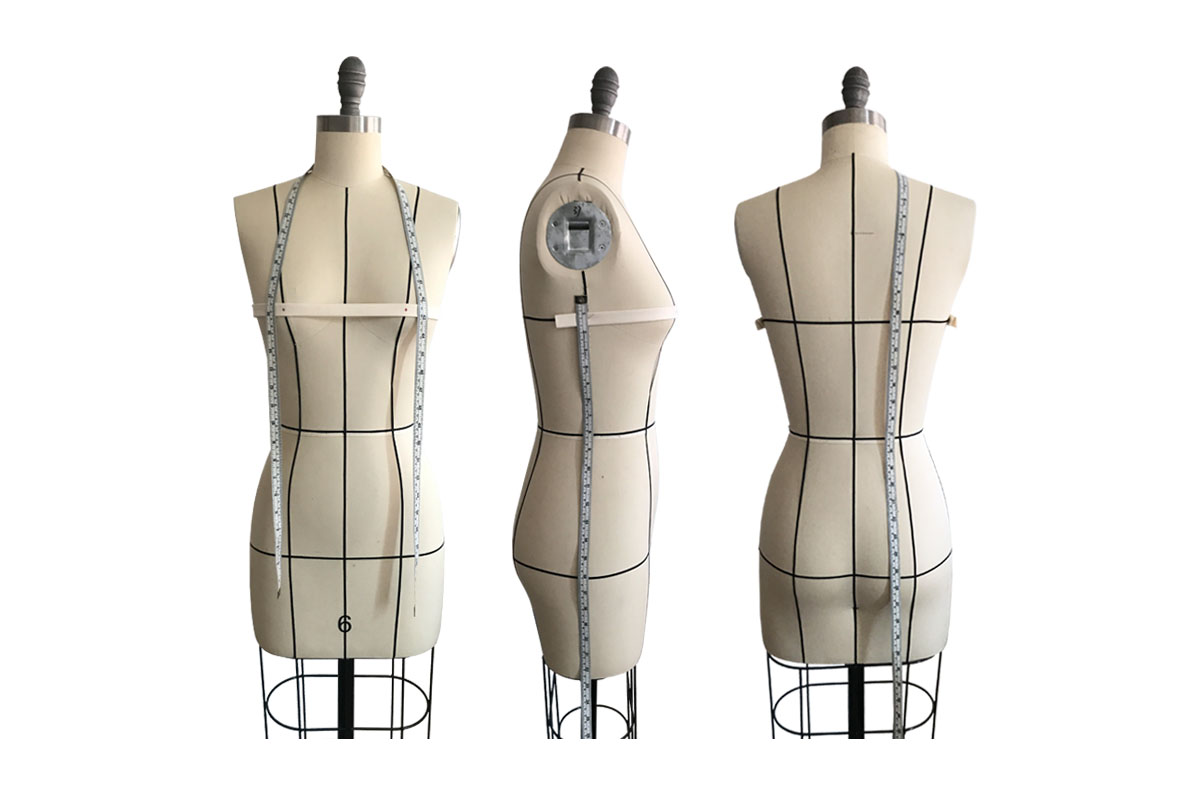
With your Measurement Tape and Dress Form Measurement Chart it is now time to start taking your dress form measurements. Use the steps and photo guide below to start recording your numbers!

1. Chest Circumference is taken around the fullest part of the bust along taped guideline measure over the bust bridge
2. Waist Circumference is taken around the narrowest part of the waist along taped guideline
3. High Hip Circumference is taken 3″ below bottom of waist tape
4. Low Hip Circumference is taken along fullest part of hip along taped guideline

5. CF Length is the vertical distance between the base of the neck and bottom of waist tape, measure over the bust bridge
6. CB Length is the vertical distance between the base of the neck and bottom of waist tape

7. FT Bodice Length from HPS is vertical distance between FT neck/shoulder point and bottom of waist tape
8. BK Bodice Length from HPS is vertical distance between BK neck/shoulder point and bottom of waist tape

9. FT Shoulder Slope is the FT shoulder tip to bottom of CF waist tape
10. BK Shoulder Slope is the BK shoulder tip to bottom of CB waist tape

11. New Shoulder Strap Length is the taken from the FT HPS along the side of the bust to the side waist tape

12. Bust Depth is taken from FT HPS to Apex Point
13. Bust Span is taken between Bust Points, measure over the bust bridge
14. Side Length is vertical distance taken 1″ above Bust tape to Waist tape

15. Shoulder Length is taken between Neck and Shoulder Tip
16. Back Neck is taken along BK Neck from HPS to HPS along curve

17. Front Across Shoulder is FT Shoulder Tip to CF Neck
18. Back Across Shoulder is FT shoulder tip to CB Neck
19. Across Front is taken at pinned halfway point between FT HPS and FT Bust tape
20. Across Back is taken at pinned halfway point between CB Neck and BK Bust tape
And that’s it! Now you have recorded all your measurements needed to create your Basic Sloper Set. Keep your Dress Form Measurement Sheet handy as you will be relying on it often as a quick reference when draping and drafting your designs.
If there are any questions please leave comments below! In the meantime continue learning on how to begin draping a basic sloper set – Intro to Draping: Draping the Front and Back Bodice, hope to see you there!