Draping can seem like a very difficult task and that can be true depending on what you’re draping but in general the basic foundations of draping is pretty simple, straight-forward and actually fun!
In this multi part series we will go over the basics draping terminology, important markings, taking measurements and eventually develop a basic pattern block set which includes the bodice, sleeve and skirt.
In this first post, Intro to Draping: Dress Form Basics & Markings we will start with getting familiar with the dress form by learning and placing important markings.
Let’s get started!

Materials
– Dress Form
– 1/8″W Style Tape
– Measuring Tape
– Straight Pins
The materials you will need are a Dress Form, this demo I am using a legless dress form, size 6. Style Tape which is an adhesive roll of tape that will assist with marking points on our dress form. A basic 60″ Measuring Tape and Straight Pins thin enough to easily penetrate your dress form.
Dress Form Basics
Getting familiar with your dress form is very important. There may be some various differences in your dress form depending on what brand or style but in general you dress form should have these basic features.

A lot of dress forms come with Collapsible Shoulders in order to make it easier to put on tops and dresses over the shoulder. This is an optional feature but definitely convenient.
The Arm Plate represents the circumference of the arm. Some plates are removable on one or both sides in order to attach arms.
The Cage on the dress form in absence of the legs helps when fitting skirts.
The Roller Wheels are convenient when transporting the dress form, some roller wheels have stops to secure your dress form in place.
Height Pedal is great to adjust the height of your mannequin to help compensate length of skirt or dresses.
Dress Form Markings
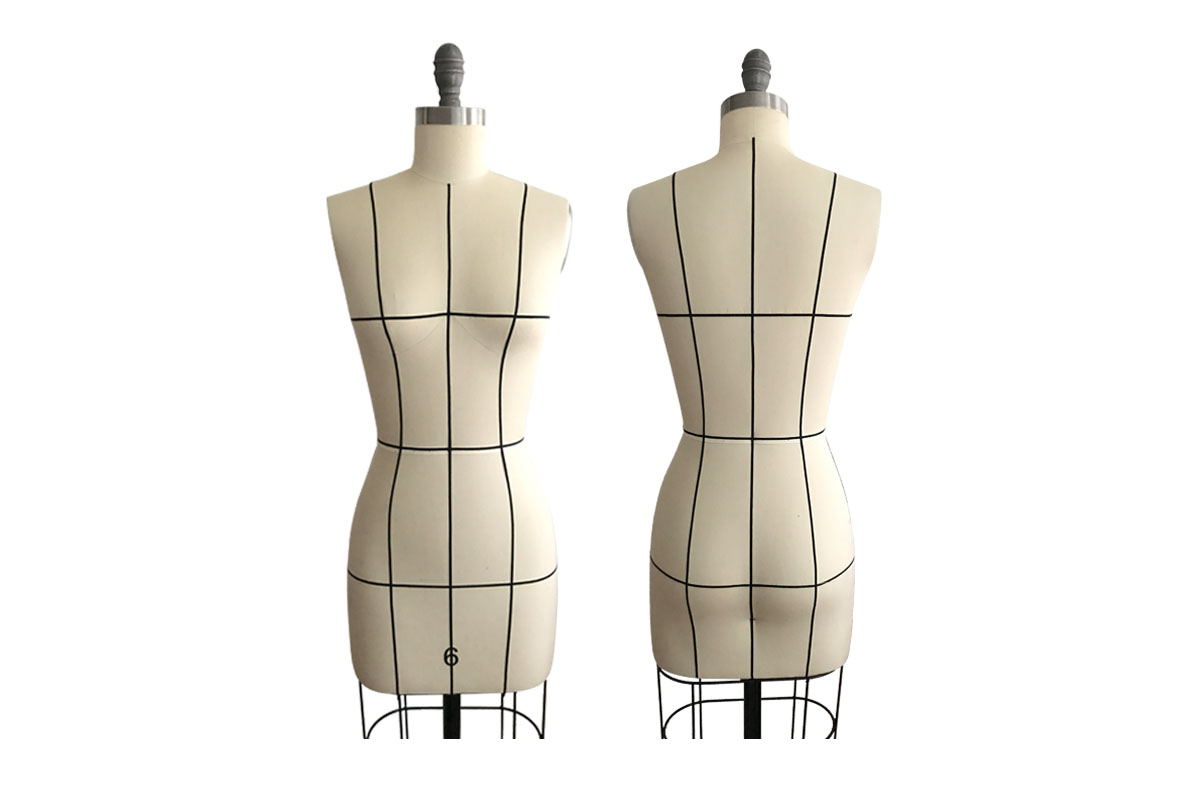
As you may have noticed, the dress form has built in seam lines. These placements are important points and areas on the body when it comes to draping in order to keep your design balanced and accurate. Using your style type, you will want to emphasize these points and placements to help better guide you in draping.
1. Center Front is the vertical distance between the bottom of neck seam to bottom of dress form
2. Center Back is the vertical distance between the bottom of neck seam to bottom of dress form
3. Front Princess Line is placed from the center of the shoulder through apex, 1/4″ width of front waist and 1/4″ width of front bottom dress form
4. Back Princess Line is placed from the center of the shoulder through 1/4″ width of back waist and 1/4″ width of back bottom dress form
5. Side Seam is placed at the bottom of arm plate to bottom of dress form
6. Shoulder Line is placed from the high point of shoulder (neck meets shoulder line) and shoulder edge (shoulder meets armhole)
7. Bust Line passes through the highest point of the bust all around, keep horizontal
8. Waist Line is the smallest point of the waist all around, keep horizontal
9. Low Hip Line passes over the widest point of the hip, keep horizontal
10. Apex is at the the highest point of the bust

Marking Dress Form with Style Tape


- Mark All Front Vertical Lines – Center Front and Princess
2. Mark All Back Vertical Lines – Center Back and Princess
3. Mark Side Vertical Lines and Shoulder Lines


4. Mark All Front Horizontal Lines – Bust, Waist and Hip
5. Mark All Back Horizontal Lines – Bust, Waist and Hip
6. Lastly – Mark Apex Points with Straight Pins
Important Notes
It’s important for the overall balance of your patterns to double check the accuracy of your tape placements. Ensure that your tape placements are the same and consistent on either side by measuring and comparing lengths and widths between points.
Make sure all horizontal placements are leveled all around.
To ensure your style tape stays in place while draping and handling – place straight pins through tape and form at various points.
And that’s it ! We went over the basic terms of the dress form and now we have our dress form marked with style tape at the important placements.
If there are any questions please leave comments below! In the meantime continue to get familiar with your dress form by moving onto the next post – Intro to Draping: Measuring Your Dress Form, hope to see you there!